


“I can’t wait to migrate this 10,000-page website to a new CMS!”
Said no one, ever.
Website migrations are the ugly step-child of the web development world. They’re not glamorous and one small oversight can have massive consequences on a company’s search traffic.
That being said, migrations can be easy to complete with the right website migration process.
Unfortunately, far too many web developers overlook one critical element in the process: search engine optimization.
Related: how to know that it’s time for a website update.
We get it: you’re not an SEO. Your job is to make a great website.
But what if launching that website results in your company losing half of their online business? Will they still see that website as great?
Half of their online business, you say?
Yep, because that’s how much of your total website traffic comes from organic search.
Far too many developers overlook simple SEO elements that will destroy a company’s search rankings.
Today, we’re going to delve into the SEO side of the website migration process that we live by at Interweb. We’re going to give you our step-by-step website migration checklist to ensure that you cover the most essential SEO elements.
Please note, if you’re changing your domain name, there will be a few additional steps to take care of.
1. Scrape All Existing Site Data
Far too many developers fail to save a copy of the most essential information from the original site.
So what “information” are we referring to?
- A backup of MySQL and WP-Content files
- A full list of the indexed pages on the original site (all working pages, 301 and 302 redirects, 404 errors, and 410 headers)
- Title tags and meta descriptions for all working pages
- Canonical tags for all working pages
Why do you need to save a copy of this site data?
Short answer: this is your safeguard in case anything goes wrong.
We’ve seen websites that lost all their title tags and meta descriptions because the development team forgot to copy these to the new site.
If these developers had saved a copy of the original meta data, they could have copied and pasted this into the new site. Instead, those sites saw their search rankings plummet. Google no longer understood what each page on their site was actually about.
Failing to note any redirects on the original site will result in a massive spike in broken pages on the new site. This will hurts search rankings and user experience.
404 errors are broken pages. These old URLs should be redirected on the new site. From there, migrate 410 headers to the .htaccess file on the new site. 410 headers tell search engines that a page should be removed from search results. Identifying these pages helps search engines to dedicate more resources to the most valuable pages on your site.
So how do you pull a copy of this data?
Our suggested tool is Screaming Frog. The free version allows you to pull all the above data for up to 500 pages on a website. The paid version (~$160/year) removes the page limit.
2. Discourage Search Engines from Crawling Your Staging Site
We’ve seen dozens of web dev teams forget to hide their staging site from search engines. Far too often, these staging sites will end up getting indexed while the new site is still in progress.
This is a serious issue for 2 reasons:
1. Short term: customers who search for your company could land on the staging site. This can hurt your company’s brand image.
2. Long term: if Google indexes the staging site with the new website copy, Google will view the staging site as the original source of that copy. As a result, the staging site will appear in search results instead of the new site.
Yep, that’s right. If the staging site is indexed, your brand new site could be removed from search results.
Ok, so how do I see if Google indexed my staging site?
Type the following into Google, replacing “yourdomain” with the domain name that you host your staging sites on:
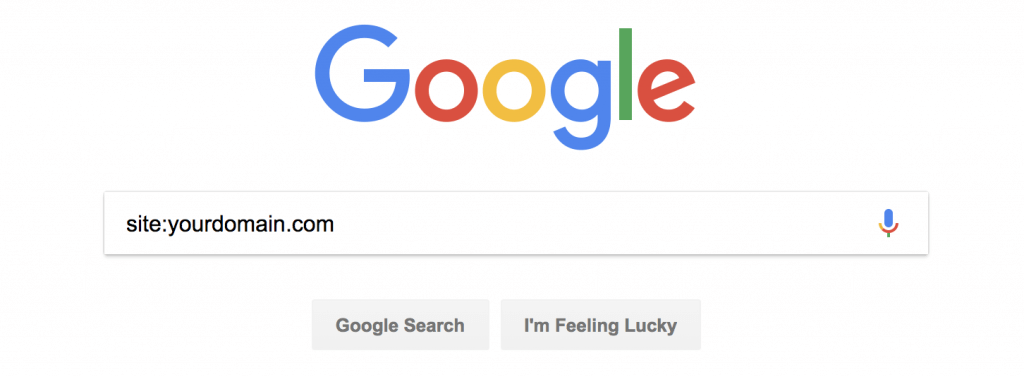
Do any of the URLs from staging sites pop up in search results?
If so, remove those URLs from search results using Google Search Console.
So how do I prevent this from happening during my next site migration?
Short answer: set up a robots.txt file.
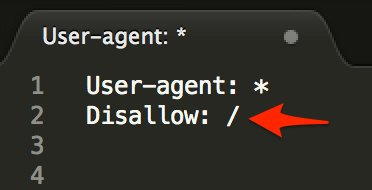
The “Disallow: /” line tells search engines to ignore all pages on that particular subdomain.
NOTE: search engines occasionally ignore this file, so it’s always a good idea to see if Google indexed your staging site before launching the new site. For those who want to take this a step further, set meta robots tags to “noindex, nofollow” for each page on the staging site.
Related: see how we helped one client to see a 118% increase in conversions after a website redesign.
3. Compare the Existing vs. New Page Hierarchy
Compare the page hierarchy for the new site to the structure of the original site.
- Which URLs will change from the existing site to the new site?
- Which pages will be removed from the original site?
Pull up the list of URLs that you scraped from the original site with Screaming Frog. Paste them into a doc like this one:

Take the full list of pages that you will remove from the new site. Identify if you should redirect those URLs to a working page on the new site, or remove them completely using a 410 header.
Not sure whether to redirect or 410 these pages? Shoot me a note and I’ll be happy to share my feedback.
4. Set Up Redirects on the Staging Site
Note the pages in the above list that will need to be redirected. We recommend that those working with WordPress sites use Yoast Premium (paid) or Redirection (free) to set up these redirects to the new URLs.
These redirects can also be set up in the .htaccess file. However, making a mistake in your .htaccess file can lead to serious site issues.
NOTE: we won’t spend long talking about copy scraping, QA testing, etc. for the staging site. However, here are a few secrets that we’ve learned from our website launches that save time and keep our clients way happier:
- If working with WordPress, create a duplicate version of the WordPress database or use the WordPress Importer function to import all existing site copy (rather than trying to manually copy over data).
- Use a keyword ranking tool to evaluate keyword ranking changes of your most valuable keywords during this migration.
Our team uses SEMRush for monitoring keyword ranking changes. However, there are dozens of other great tools for doing this as well.
Evaluate any pages that see a massive ranking drop after the site migration first. These pages often contain technical SEO errors.
5. Set Up Your XML Sitemap
A sitemap is a roadmap that tells search engines how to navigate through a site. Creating a sitemap for the new version of your site is essential.
So how do you create a sitemap?
If you’re building the site on WordPress, save yourself time and use the Yoast plugin to create a sitemap for you (both the free and paid version create one for you).
For those who aren’t working with WordPress, Screaming Frog provides a powerful sitemap builder as well.
6. Launch the New Site
After taking care of the above pre-launch items, you’ll be ready from an SEO perspective to launch the new site.
The last 3 items delve into the essential post-launch SEO to-dos.
7. Update Robots.txt and Meta Robots
The single biggest SEO mistake that a developer can make during a site migration is forgetting to update indexability settings.
While working on the staging site, we told Google not to index your site. Now, we need to allow Google to index your site.
Forgetting this step can prevent the new site from showing up in search results. This will cause a massive drop in search rankings.
So how do we allow Google to index our site?
First, we update the robots.txt file to remove the line that states “Disallow: /”.
Second, we change the meta robots settings from “noindex, nofollow” to “index, follow” to (almost) every page on the site.
- “Thank You” pages – pages that site visitors are sent to after filling out a contact form or downloading a piece of gated content.
- Login pages – leaving login pages indexable can leave your site vulnerable to brute force login attempts.
- Taxonomy pages (tags, categories, etc.) – this is heavily debated amongst SEOs. Our take is to evaluate search rankings of these types of pages first. Deindex any of these pages that lack valuable search rankings. Keep any of these pages indexed that do hold valuable search rankings.
8. Scan the New Site for SEO Errors
After updating meta robots and the robots.txt file, run a crawl of the new site to identify any outstanding SEO errors.
We recommend using SEMRush’s audit report to crawl the entire site for any outstanding errors.
For those who prefer to search manually, here are the most pressing post-migration errors to watch out for:
1. 4xx errors
Crawl the newly indexed site using Screaming Frog. Identify any 404 or other 4xx errors. Redirect (301 or 302) or deindex (410) each of these remaining broken pages.
2. Broken internal links & external links
Broken links become a serious issue whenever the URL structure of a site changes. Developers often forget to 301 redirect old pages to the new ones. You can identify these broken links using the Check My Links Chrome extension. Remove these broken links from the site.
3. Duplicate content
Duplicate content is an underrated SEO issue that can destroy a site’s organic traffic. Search engines could take 2-4 weeks to crawl your new site, and search engines won’t catch these issues until that time. As a result, this issue should be checked 2-4 weeks after launching the new site.
Do a site search for your website. Note the number that pops up below the search bar in the section labeled “About ____ results”
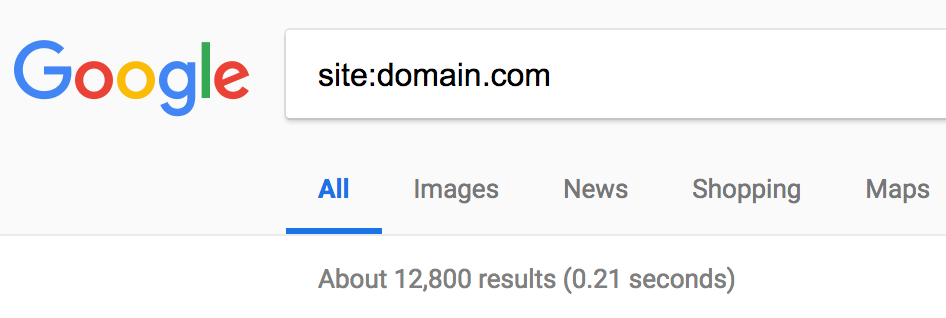
Now scroll to the bottom of the search engine results page (SERPs) and skip to the last page of search results. Do you see the following error message?

This is Google’s way of telling you that you have a lot of pages on your site that are very similar to that first handful of results that they shared. If you’re seeing this, you probably have a lot of duplicate content or issues of keyword cannibalization.
Not sure how to fix this? Schedule a call and I’ll walk you through how to get this resolved.
4. WWW. resolve issues
Type “http://www.mydomain.com” into your browser. Now type “http://mydomain.com” into your browser.
Does one version of the site redirect to the other? If not, update your .htaccess file to get one of the 2 versions to redirect to the other.
9. Set Up Search Console
Once you’ve resolved the above issues, the final step is to get the new version of the site indexed.
Go to Google Search Console (formerly Google Webmaster Tools) and verify your ownership of your site. Our team then handles a dozen valuable SEO-related items including:
- Setting the preferred version of the website
- Checking for security issues
- Evaluating mobile usability
- And more
However, the only essential item to take care of is submitting your sitemap to Google.
You can do this by opening the “Index” tab and selecting “Sitemaps” from the dropdown list.

And just like that, you’re good to go!
- Scrape all existing site data
- Discourage search engines from crawling your staging site
- Compare the existing vs. new page hierarchy
- Set up redirects on the staging site
- Set up your sitemap
- Launch the new site
- Update robots.txt and meta robots
- Scan the newly launched site for SEO errors
- Set up Search Console
Still have questions or concerns about the SEO to-dos for a website migration? Comment below or reach out on Twitter and we’ll do our best to help.
In the meantime, sign up for our newsletter below to be the first to read our insights.
SCALE YOUR ORGANIC TRAFFIC
Subscribe to our monthly newsletter


